
Your GPU came with software that most people install once and never open again. That’s a mistake not because the default settings are terrible, but because both the Nvidia App AMD Adrenalin gaming settings contain that meaningfully affect how your games feel to play, and none of them require buying new hardware to unlock.
This guide covers both tools side by side. Every major setting gets a plain-language explanation of what it actually does, which GPU generations it applies to, and whether to enable or skip it. Entry-level gamers will understand what each toggle does and feel confident changing it. Intermediate gamers will understand the mechanism well enough to make their own decisions when the defaults don’t fit their use case.
PART ONE: THE NVIDIA APP
The Nvidia App: What It Is and How to Get It
The Nvidia App replaced GeForce Experience in 2024 and is now the standard companion software for every GeForce GPU. As of June 2026, the current version is 11.0.3.241. It combines driver updates, GPU settings, the in-game overlay, and game optimisation into a single interface three separate tools that used to require separate installs.
Download it directly from Nvidia.com It installs in about half the time GeForce Experience used to take, and crucially, it no longer requires an Nvidia account login for basic functionality. Driver installs, performance settings, the overlay, G-Sync configuration all work without signing in. Login remains optional if you want GPU bundle rewards or cloud features, but the gate on everyday use is gone.
One important note for older GPU owners: The Nvidia App supports GTX 1000 series and newer. If you’re running a GTX 900 series or older, the Nvidia App won’t install. Stick with the legacy GeForce Experience for those cards.
The Nvidia Control Panel still exists.
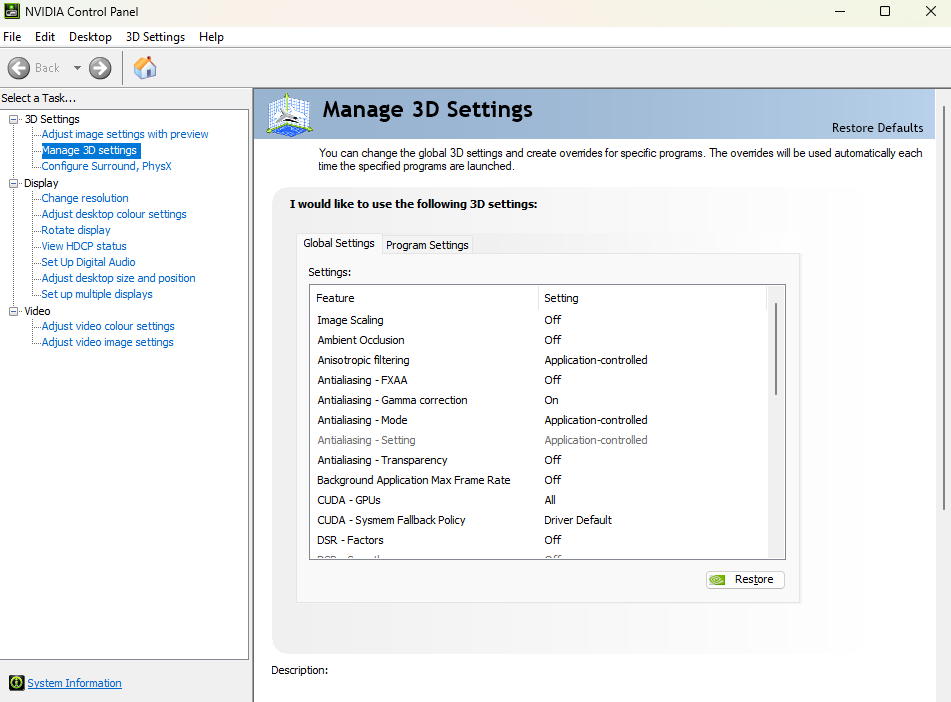
It’s installed automatically alongside the Nvidia App. In 2026, the Nvidia App handles most settings but a handful of advanced 3D settings still sit in the classic Control Panel (right-click desktop → Nvidia Control Panel). For everything in this guide, the Nvidia App is where you’ll be working. When you need the Control Panel for a specific setting, it’ll be called out directly.
The Driver Tab: Keep This Current
Open the Nvidia App and go to the Drivers tab. This is where you check for and install Game Ready Drivers.
What Game Ready Drivers actually do: Nvidia releases a new driver for every major game launch. These include per-game optimisations that Nvidia develops in partnership with developers typically 3–7% additional performance in the supported title on launch day, sometimes more. They also fix bugs and driver-level issues that affect stability across all games.
Game Ready vs Studio Driver: Two options appear in the Drivers tab. Game Ready Drivers are optimised for gaming use these. Studio Drivers are tuned for creative applications like Blender and DaVinci Resolve and prioritise stability over peak gaming performance. If you only game, always pick Game Ready.
How to do a clean install: When updating drivers, click the three-dot menu next to the driver and choose Clean Install. This removes old driver files before installing the new ones. Most updates don’t require this but after a major version jump or when troubleshooting stuttering or crashes, a clean install eliminates driver residue as a cause. Nvidia App supports rolling back to the previous driver if a new one causes problems the rollback option appears in the same Drivers tab.
Graphics Settings: The Ones Worth Changing
Navigate to Settings → Graphics in the Nvidia App. This is where global and per-game settings live.
Power Management Mode
What it is: This setting tells the GPU how aggressively to respond to workload spikes.
What it actually does: The default “Optimal Power” setting allows the GPU to run at lower clock speeds during momentary lulls between frames to save energy. The problem: games don’t always give the GPU clean signals about when a heavy frame is coming. If the GPU downclocks at the wrong moment and then gets hit with a demanding frame, it has to ramp back up and that ramping delay shows up as a frame time spike. Setting this to “Prefer Maximum Performance” keeps the GPU clocked up continuously during gaming, eliminating that specific source of stutter.
Recommended: Set to “Prefer Maximum Performance” for desktop gaming. The electricity difference is minimal. On a laptop, use this setting only when plugged in it significantly increases battery drain and heat in portable mode.
How to set it: Nvidia App → Settings → Graphics → Global Settings → Power Management Mode → Prefer Maximum Performance.
Low Latency Mode
What it is: Controls how many rendered frames the GPU is allowed to queue up before sending them to the display.
What it actually does: By default the GPU queues 1–3 frames ahead of what you’re seeing. Each queued frame adds latency between your input and what appears on screen the action happens, the CPU processes it, the GPU renders it, and only then does it display. Low Latency Mode reduces or eliminates this queue, so frames are rendered closer to the moment you’d actually see them. The result is lower perceived input lag particularly noticeable in competitive games.
The caveat: Low Latency Mode can reduce average FPS by a small amount because the GPU gets less work queued at a time. In GPU-bound scenarios at high frame rates, this is negligible. In CPU-bound scenarios where frame rates are already low, it can make stuttering slightly worse.
Recommended: Set to “On” for most games. “Ultra” mode is more aggressive and worth trying in competitive titles if it causes stuttering, drop back to “On.” If a game natively supports Nvidia Reflex (most major 2024–2026 titles do), use Reflex instead of Low Latency Mode — Reflex works inside the game engine and is significantly more effective than the driver setting. They don’t stack meaningfully, so don’t enable both.
How to set it: Nvidia App → Settings → Graphics → Global Settings → Low Latency Mode.
DLSS Override: The Hidden Upgrade for RTX Owners
This feature is one of the most useful things in the Nvidia App and almost nobody knows about it.
What it is: DLSS Override lets you force the latest DLSS AI model onto any game that uses DLSS, regardless of which version the game originally shipped with.
What it actually does: A game released in 2022 using DLSS 2 can be updated to run DLSS 4.5’s Transformer model with a single setting in the Nvidia App — no game update required, no waiting for the developer to patch it. The newer model produces significantly better image quality: less ghosting, sharper reconstruction, better temporal stability. Nvidia’s 2026 analysis found the Transformer model outperforms the older CNN model across all quality metrics.
Supported cards: DLSS Override works on RTX 20, 30, 40, and 50 series cards for Super Resolution upgrades. Multi Frame Generation via DLSS Override specifically requires RTX 40 or RTX 50 series hardware — the older cards can receive the improved Super Resolution model but not the frame generation component.
How to use it: Nvidia App → Settings → Graphics → select a specific game → Driver Settings → DLSS Override → set Model Presets to “Recommended.” Alternatively set it globally under Global Settings if you want all DLSS games updated at once. The “Recommended” preset applies the best model for your specific GPU generation.
G-Sync Setup
What it is: G-Sync (and G-Sync Compatible) synchronises your monitor’s refresh rate to your GPU’s frame output rather than running at a fixed 60Hz or 144Hz. The result is tear-free gaming without the input lag that traditional V-Sync introduces.
What it actually does: Traditional screen tearing happens when the GPU sends a new frame while the monitor is halfway through displaying the previous one — you see a horizontal split in the image. V-Sync prevents tearing by making the GPU wait until the monitor is ready, but this introduces latency. G-Sync eliminates the problem differently: the monitor waits for the GPU rather than the other way around, so there’s no delay and no tearing simultaneously.
Requirements: A G-Sync or G-Sync Compatible certified monitor. G-Sync Compatible is the broader certification that covers FreeSync monitors confirmed to work well with Nvidia cards — check if your monitor is on Nvidia’s verified list if you’re unsure.
How to enable it: Nvidia App → System tab → G-Sync → Enable G-Sync for Full Screen mode. Use Full Screen mode rather than “Full Screen and Windowed” — the full-screen option works correctly with Borderless Windowed mode in modern games, while the expanded windowed option can cause variable refresh behaviour in desktop applications unexpectedly.
The In-Game Overlay
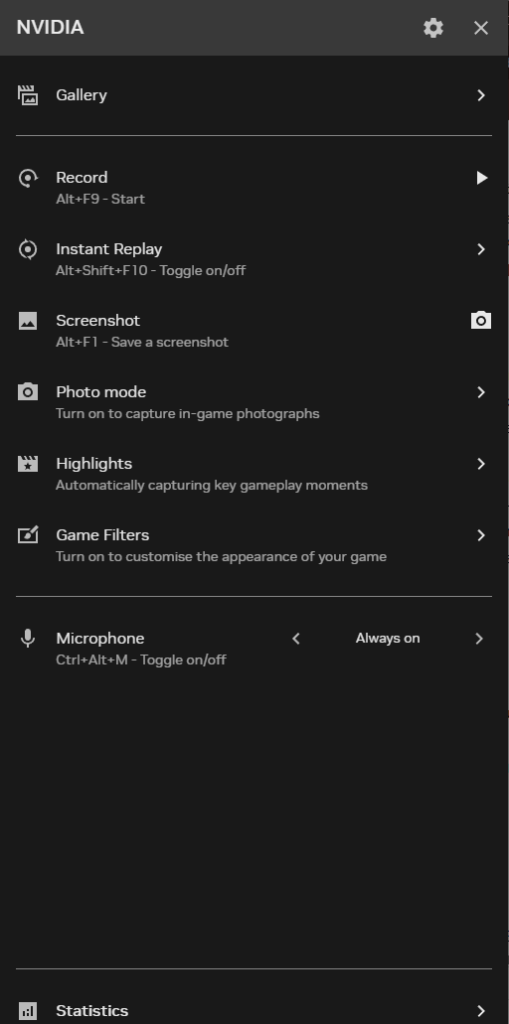
Press Alt + Z to open the Nvidia overlay while in a game. This gives you access to:
- Performance monitoring (frame rate, GPU temperature, GPU usage, VRAM usage, CPU usage)
- Recording and screenshot capture
- Filters (Freestyle) for adjusting colour and sharpness in supported games
- DLSS and Reflex status confirmation
The performance overlay is the most useful element for most gamers. Enable it at a corner of your screen and you can see whether your changes are having the intended effect in real time. The monitoring section of this series covers how to interpret those readings in detail.
Note on Freestyle: This feature applies colour and sharpness filters to games at the driver level. It doesn’t work in all titles — games with kernel-level anti-cheat (Valorant, some Call of Duty modes) block it. If Alt + F3 does nothing in your game, try switching to Borderless Windowed mode first.
PART TWO: AMD ADRENALIN
What It Is and How to Get It
AMD Software: Adrenalin Edition is AMD’s GPU driver and control software. Download the latest version from amd.com/en/support — search your GPU model and download the full Adrenalin package. The Adrenalin interface opens via the AMD icon in the Windows system tray, or with the Alt + R keyboard shortcut once installed.
The current version in June 2026 is 26.6.2. Check Software → About in Adrenalin to confirm your version. Updates appear in the Home tab when available.
Supported cards: Adrenalin supports the full Radeon RX 5000 series through RX 9000 series. Some features — particularly HYPR-RX, Anti-Lag 2, and FSR 4 — require RX 6000 series or newer. Feature availability by GPU generation is called out in each section below.
The Gaming Tab: Where Everything Useful Lives
The Gaming tab in Adrenalin has two levels: Global Graphics (applies to every game) and per-game profiles (override global settings for a specific title). For most users, configuring global settings and leaving per-game profiles for specific exceptions is the right approach.
Anti-Lag and Anti-Lag 2: Reduce Input Latency
What they are: Two different approaches to reducing the delay between your mouse or keyboard input and the action appearing on screen.
Anti-Lag (original): Works at the driver level and applies to virtually all DirectX 11, DirectX 12, and Vulkan titles on RX 5000 series and newer. It reduces the CPU-GPU frame queue similar in concept to Nvidia’s Low Latency Mode.
Anti-Lag 2: A completely redesigned version that works inside supported game engines rather than at the driver level. It coordinates the CPU and GPU rendering pipeline directly, reducing input latency more effectively than the original. Currently supported in Counter-Strike 2, Dota 2, and Ghost of Tsushima Director’s Cut, with the list growing as developers adopt the SDK. Requires RX 6000 series or newer.
Important caveat on the original Anti-Lag: Several years ago, the original driver-level Anti-Lag caused anti-cheat bans in a small number of competitive games. AMD redesigned Anti-Lag 2 specifically to avoid this by working inside the game engine rather than intercepting the render pipeline. For online competitive games with strict anti-cheat, use Anti-Lag 2 in supported titles with confidence. For games that only support the original Anti-Lag, leave it disabled in online competitive modes unless AMD has explicitly confirmed it’s safe for that title. In single-player games, the original Anti-Lag is fine to enable.
Recommended: Enable Anti-Lag 2 in any supported game. Enable original Anti-Lag in single-player titles. Use with caution in competitive online games without explicit Anti-Lag 2 support.
How to set it: Adrenalin → Gaming → Global Graphics → Radeon Anti-Lag → Enabled.
FreeSync: Tear-Free Gaming Without Latency
What it is: AMD’s variable refresh rate technology — the same concept as Nvidia’s G-Sync but available on a broader range of monitors at lower price points.
What it actually does: Same mechanism as G-Sync synchronises the monitor’s refresh rate to your frame output, eliminating tearing without the latency cost of V-Sync.
How to pair it correctly: Enable FreeSync in Adrenalin’s Display tab. Then set “Wait for Vertical Refresh” to Off in Global Graphics this prevents V-Sync from running simultaneously and negating the low-latency benefit. Set a frame rate cap a few FPS below your monitor’s maximum refresh rate (for example, 141 FPS cap on a 144Hz monitor) to keep your frame rate within FreeSync’s operating range. When frame rate drops below the FreeSync range (typically 48Hz minimum for most monitors), tearing can reappear briefly this is normal behaviour, not a fault.
HYPR-RX: The One-Click Performance Bundle
What it is: A single toggle that simultaneously activates AMD Fluid Motion Frames 2 (AFMF 2), Radeon Super Resolution, Anti-Lag, Radeon Boost, and Radeon Chill in one click.
What it actually does: AMD’s own testing on the RX 9070 XT showed 1.3–2.3x performance increases with HYPR-RX enabled at 4K in GPU-limited scenarios. Independent testing puts real-world gains at 1.3–1.8x, which is still meaningful. The frame generation component (AFMF 2) generates additional frames between rendered ones, and the upscaling component (RSR) renders at a lower internal resolution and reconstructs a sharper image.
Requirements: RX 7000 series or newer, or Ryzen 7040 APU or newer.
The honest caveat: HYPR-RX bundles everything together including Radeon Boost (which dynamically lowers resolution during fast motion) and Radeon Chill (which limits frame rates during low-action scenes). In competitive multiplayer games, you generally want Anti-Lag active without Boost and Chill and HYPR-RX doesn’t let you separate them within the single toggle. For competitive play, configure settings manually. For single-player AAA games where you’re GPU-limited and want maximum FPS without setting up each feature individually, HYPR-RX is a legitimate shortcut.
Also important: Frame generation via AFMF adds input latency. HYPR-RX auto-enables Anti-Lag alongside it to partially compensate, but the latency addition is real. Enable HYPR-RX when your base frame rate is already at 50–60 FPS or higher using frame generation to rescue genuinely unplayable frame rates makes the input lag situation worse, not better.
Radeon Super Resolution vs In-Game FSR: Know the Difference
This distinction confuses a lot of people because AMD uses FSR in both contexts but the two implementations are different.
Radeon Super Resolution (RSR) is a driver-level spatial upscaler that works in any game, regardless of whether the developer added FSR support. The game renders at a lower resolution and RSR reconstructs a higher-resolution image before it reaches your display. No game support required. It uses the older FSR spatial algorithm without motion data. Quality degrades noticeably below 70% scaling use Quality preset (77% scaling) or higher.
In-game FSR 3 or FSR 4 is implemented inside the game engine by the developer. It uses motion vectors data about how objects are moving frame to frame to produce significantly sharper temporal reconstruction than RSR can achieve. Where a game offers native FSR, always use that instead of RSR.
The rule: if the game has built-in FSR support, use it in-game and leave RSR off. If the game has no FSR support and you need more performance, RSR is your fallback.
Radeon Boost: Conditional Use Only
What it is: A dynamic resolution feature that automatically lowers the render resolution during fast on-screen motion, then restores full resolution when the camera stops moving.
What it actually does: During camera sweeps and fast movement in games, the GPU has to process a lot of pixel changes simultaneously. Boost reduces resolution at those moments to maintain frame rate, reasoning that you’ll perceive the lower resolution less during fast motion than during static scenes.
Recommended use: Off by default. Enable it specifically for games where maintaining 60+ FPS consistently matters more than perfect resolution during motion racing games, fast-paced first-person games where you’re frequently turning. Disable it entirely for competitive multiplayer where resolution consistency matters more than peak frame rate.
Image Sharpening
What it is: A post-processing filter that enhances edge contrast to make the image look sharper.
What it actually does: Applies a sharpening pass to the final frame before it reaches your display. At moderate levels (60–80% sharpness) it counteracts the slight softness introduced by upscaling particularly useful when RSR is active. At high levels it introduces visual artifacts and oversharpening that looks worse than no sharpening at all.
Note: Image Sharpening is automatically disabled when RSR is active AMD’s integrated RSR+sharpening pipeline handles both together. You don’t need to configure them separately.
Recommended: 60–80% if you use RSR. Otherwise, a light global sharpening of 30–50% can improve perceived clarity in games that use temporal anti-aliasing (which tends to soften the image). More than 80% typically looks artificial.
The Performance Overlay
Press Ctrl + Shift + O in any game to open the Adrenalin performance overlay. This shows GPU temperature, GPU usage, VRAM usage, frame rate, and frame time in real time. Use it to verify that Adrenalin settings are having the expected effect if you enable a setting and frame rates don’t change, the overlay tells you why.
The monitoring article in this series covers how to interpret every reading in detail.
The Quick Summary: What to Actually Do Today
Nvidia App users:
- Install it if you haven’t, update to the latest Game Ready Driver
- Set Power Management Mode to Prefer Maximum Performance
- Set Low Latency Mode to On (or use Reflex in-game where supported)
- Enable DLSS Override → Recommended for games you play that use DLSS
- Enable G-Sync if your monitor supports it
AMD Adrenalin users:
- Update to driver 26.6.2 or the current latest
- Enable Anti-Lag (or Anti-Lag 2 in supported games)
- Enable FreeSync, set Wait for Vertical Refresh to Off, add a frame cap a few FPS below your monitor’s maximum
- Enable HYPR-RX for single-player AAA gaming if you’re GPU-limited
- For competitive multiplayer: disable HYPR-RX, configure Anti-Lag manually, leave Boost and Chill off
None of these changes are risky. All of them are reversible. And every one of them has a real effect on how your games feel.
SpecClear participates in affiliate programmes. When you purchase through links on this site we may earn a commission at no additional cost to you.
Continue Reading: The Full Gaming Optimisation Series
This article is part of SpecClear’s complete PC gaming optimisation series. Work through all six guides to get the most out of your hardware.