
AMD ships Ryzen Master with every Ryzen processor. Intel ships XTU as a free download for every Intel K-series chip. Most people never open either of them.
That’s not necessarily a mistake. For entry-level gamers, the Windows 11 settings covered in our optimisation guide will deliver everything you need without touching either of these tools. For intermediate users who want to understand what’s happening inside their CPU and potentially squeeze more performance out of hardware they already own Ryzen Master and Intel XTU are where that work happens.
This Ryzen Master Intel XTU guide explains what each tool actually does, what the readings on the dashboard mean, and which features are safe and worthwhile versus which ones require more knowledge than most gamers want to develop. You won’t feel like you’re about to break something by the end of it.
What Ryzen Master and Intel XTU Actually Are
Both Ryzen Master and Intel XTU do the same fundamental job: they let you read real-time data about what your CPU is doing, and optionally adjust the parameters that govern how it runs without rebooting into BIOS.
Think of BIOS as the place you make permanent changes to how your system starts up. Ryzen Master and XTU are the equivalent of a dashboard you can open while Windows is running. You can see what’s happening right now temperatures, clock speeds, power draw, voltage and make adjustments that take effect immediately. Most changes persist across reboots through a profile system; some revert automatically if the system crashes, which is a useful safety feature.
Neither tool is required for a well-performing system. Both are optional enhancements for users who want more visibility and control than Windows provides by default.
PART ONE: AMD RYZEN MASTER
Who Should Install It
Anyone on an AMD Ryzen desktop processor Ryzen 3000 series through Ryzen 9000 series on AM4 or AM5. It’s free from AMD’s website at amd.com/en/products/software/ryzen-master.html.
Important before you install: Every time Ryzen Master opens, AMD displays a warning that the tool enables overclocking, which voids your CPU warranty. This is AMD covering themselves legally, it applies to aggressive manual overclocking and Curve Optimizer tuning, not to simply using the monitoring dashboard. But read it and be aware.
One important limitation for Ryzen X3D owners: Ryzen 7 5800X3D, 7800X3D, 9800X3D and similar 3D V-Cache chips restrict traditional manual multiplier overclocking because the stacked cache is sensitive to excess voltage and heat. Precision Boost Overdrive and Curve Optimizer still work on most X3D chips but check AMD’s current supported features list for your specific model before investing time in tuning.
The Ryzen Master Dashboard: What You’re Looking At
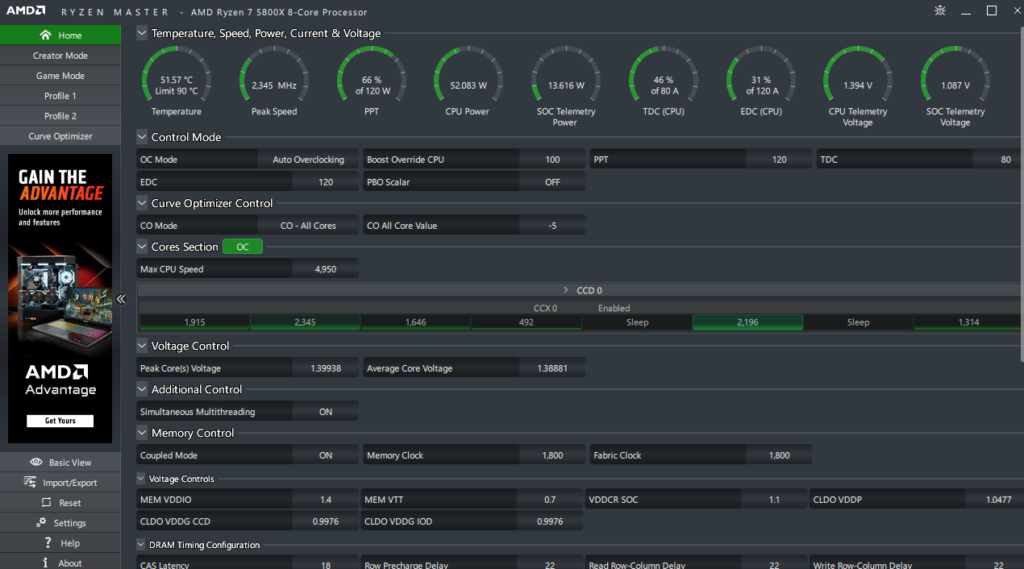
When Ryzen Master opens, the first screen is Basic View. You’ll see:
- Temperature: Your CPU’s current temperature in Celsius. Normal gaming range is 70–85°C for most Ryzen processors. Up to 90–95°C is within AMD’s specified maximum for Ryzen 9000 series chips AMD designed these processors to run hot, which surprises a lot of people who expect lower numbers.
- Peak Speed: The current boost clock in GHz. This number fluctuates constantly that’s normal. Ryzen’s boost algorithm adjusts frequency dozens of times per second based on workload, temperature, and available power headroom.
- PPT / TDC / EDC: Three power and current limits that govern how aggressively the CPU can boost. PPT is total package power (watts), TDC is sustained current the VRMs can deliver long-term, EDC is peak current during short burst demands. These are the numbers PBO adjusts.
- Voltage: CPU core voltage in volts. Ryzen processors run between approximately 0.8V at idle and 1.4–1.5V during single-core boost. Seeing 1.4V during a gaming session is normal, not dangerous.
The Advanced View button at the bottom unlocks the full interface with profiles and tuning controls.
Eco Mode: The Safe Setting for Hot or Loud Systems
What it is: Eco Mode is a TDP reduction feature that caps your CPU’s power draw at a lower thermal design point than its default.
What it actually does in practice: A Ryzen 9 9950X has a default 170W TDP. Eco Mode drops it to 65W. The CPU runs significantly cooler and quieter because it’s consuming less power and generating less heat. Performance drops in sustained multi-core workloads rendering, video encoding because the processor can’t sustain its highest boost states as long. For gaming, which typically uses a handful of cores at high frequency rather than all cores simultaneously, the performance impact is often minimal to negligible.
Who it’s for: Builders using smaller cases with limited airflow. Anyone bothered by fan noise during light gaming sessions. Systems where the cooler is marginal for the processor’s TDP. Ryzen 9000 series 65W desktop processors can also be pushed upward to 105W Eco Mode, which effectively unlocks additional performance without going to full stock TDP.
How to enable it: In Ryzen Master, switch to Advanced View. Under any profile, look for the Eco Mode toggle. Enable it and click Apply. A restart is required for Eco Mode changes to take effect.
Precision Boost Overdrive (PBO): More Performance, Done Carefully
What it is: AMD’s Ryzen processors have built-in boost behaviour that automatically increases clock speeds when power, temperature, and current headroom are available. PBO raises the limits on how high those parameters can go, giving the CPU more room to boost aggressively.
What it actually does: At stock settings, the CPU is constrained by manufacturer power limits designed to work reliably across all motherboards and coolers. Your specific system likely has more headroom than those conservative defaults allow for. PBO tells the CPU: your actual limits are higher than the defaults boost as far as your temperatures and silicon quality allow. The result is higher boost clocks, particularly during single-core bursts that gaming relies on heavily.
The honest caveat: PBO’s benefit varies dramatically between individual CPUs. Two identical Ryzen 7 9800X3D chips off the same production line can have different silicon quality one might boost 100–150MHz higher under PBO, another might gain almost nothing. You genuinely can’t know without testing on your specific chip. Run Cinebench 2024 before and after enabling PBO to measure the actual difference on your hardware.
How to enable it: Advanced View → Profile 1 → Control Mode dropdown → select Precision Boost Overdrive → click Apply. You’ll need to restart when prompted. A simple PBO enable with no other changes is the safe starting point don’t touch PPT, TDC, or EDC manually until you understand what they do.
Curve Optimizer: For Intermediate Users Only
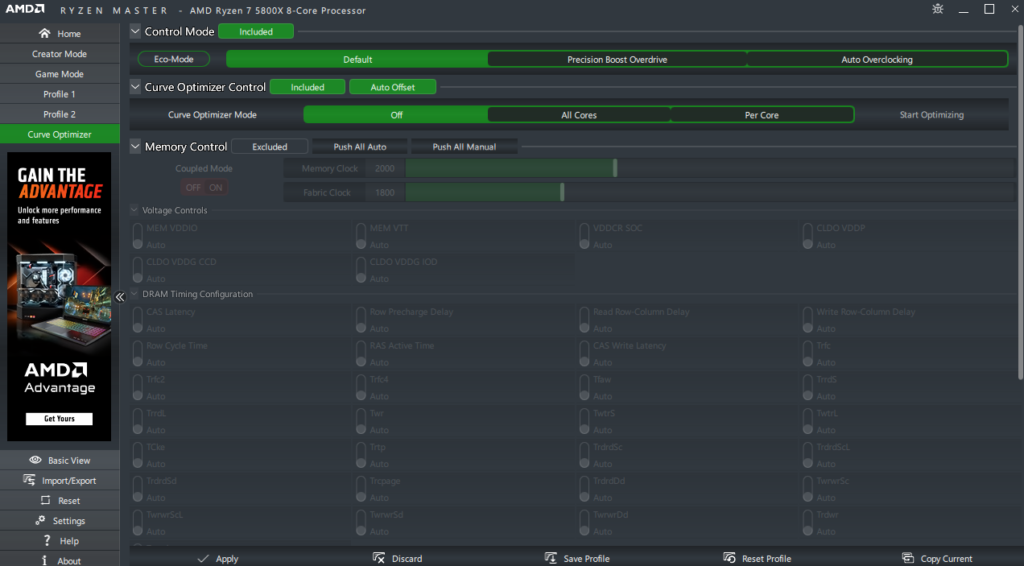
What it is: Curve Optimizer adjusts the voltage-frequency curve of your CPU’s cores specifically, it lets you reduce the voltage required to hit any given clock speed.
What it actually does: Modern CPUs are manufactured with a small voltage overhead above the minimum needed for stability, because processors vary slightly even within the same product line. If your specific chip can run stably at less voltage than AMD’s conservative default, Curve Optimizer lets you take advantage of that. The result: the CPU runs at the same or higher frequencies while consuming less power and generating less heat which gives the automatic boost algorithm more thermal headroom to sustain higher speeds for longer.
The measured result from testing: Club386’s testing with a well-binned chip found a negative value of -40 delivered a 5.3% multi-core performance uplift while reducing power consumption by 18.8%. That’s a genuinely meaningful improvement from a free software change.
Why it’s intermediate territory: The safe Curve Optimizer value is different for every single CPU, and finding it requires incremental testing and stability validation. Start at -10 for All Cores, run a 10-minute Cinebench multi-core test, check for crashes. If stable, try -15, then -20. Each time, test stability before pushing further. The process takes hours and requires comfort with stress testing. If you’re not ready for that, enable PBO without touching Curve Optimizer and walk away you’ll still benefit.
How to access it: Advanced View → Curve Optimizer section on the left panel → start with All Cores, enter -10, Apply → test → work gradually to more negative values until instability appears, then return to the last stable setting.
Saving and Switching Profiles
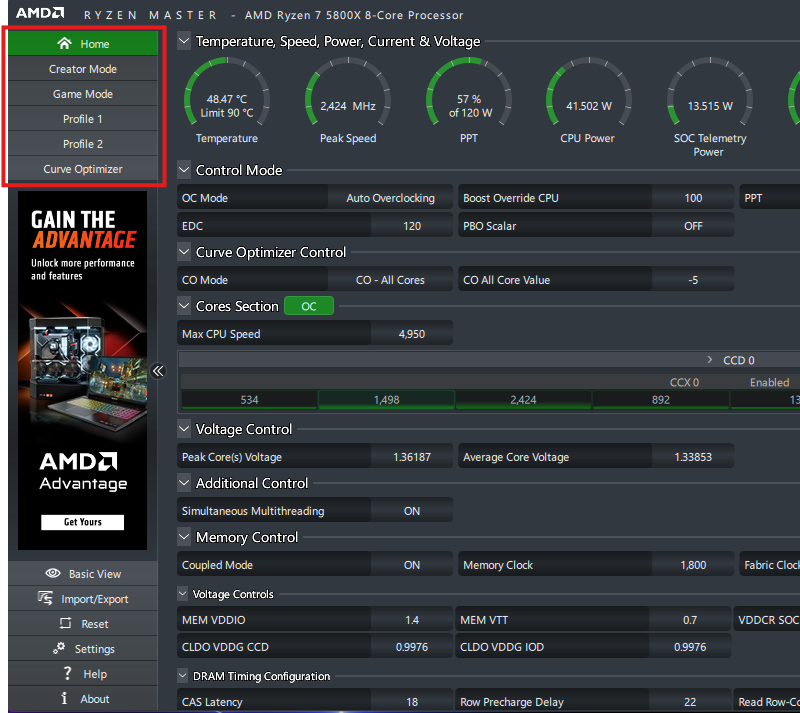
Ryzen Master supports four profiles Creator Mode, Game Mode, Profile 1, and Profile 2. Creator Mode and Game Mode are pre-configured presets. Game Mode on multi-core processors limits operation to 8 cores, which can benefit single-threaded game performance on high core count chips that have to route work across multiple chiplets. Profile 1 and Profile 2 are blank slates you configure yourself.
Save any tuning you want to keep using the Save As A Profile button. You can then switch between profiles from the Ryzen Master home screen useful if you want aggressive gaming settings in one profile and a quiet Eco Mode configuration for everyday use in another.
PART TWO: INTEL EXTREME TUNING UTILITY (XTU)
Who Should Install It and What You Need
Intel XTU is free from Intel’s website at intel.com Before downloading, confirm two things:
First, you need an unlocked K-series or KF-series CPU Core i5-14600K, i7-14700K, i9-14900K, Core Ultra 9 285K, and similar. Non-K processors can run XTU in a monitoring-only mode but most tuning features are locked. Budget and mid-range Intel chips ending in no suffix or in F only (without K) won’t have access to full overclocking controls.
Second, you need a Z-series chipset motherboard Z890, Z790, Z690, or equivalent. B-series motherboards (B760, B660, B850) only support memory overclocking through XTU, not CPU frequency or voltage tuning.
One critical system requirement: Intel XTU requires Virtualization-Based Security (Memory Integrity) to be disabled before it will launch. If you open XTU and get a VBS error, go back to the Windows 11 optimisation guide’s Step 5 and disable Memory Integrity first. XTU will tell you this itself if it’s an issue it won’t crash silently.
Two separate versions exist as of 2026. Download the correct one for your hardware:
- XTU version 7.14 (released March 31, 2026): For Intel Core 14th generation and older
- XTU version 10.0 (released March 31, 2026): For Intel Core Ultra Series 2 (Core Ultra 200 series) and newer
The XTU Interface: What You’re Looking At
XTU opens in Compact View showing a Speed Optimizer button and a benchmark. Click Advanced View for the full interface.
System Information tab: Your CPU name, architecture, core count, cache sizes, supported instruction sets. Useful for confirming what Intel officially says about your chip’s specifications.
Dashboard: Real-time graphs of CPU frequency, package temperature, core voltage, and power consumption. The frequency graph shows your actual clock speed second by second you’ll see it spike during load and drop during idle. Package temperature is the whole CPU’s thermal reading; individual core temperatures can vary more widely.
What normal looks like on Intel: Core temperatures during gaming typically run 70–90°C on unlocked K-series chips. The Intel Thermal Velocity Boost system is designed to run right up to the maximum junction temperature (100°C on most 12th–14th Gen chips) and throttle only if that limit is sustained. Brief temperature spikes to 90–95°C during heavy load are normal, not dangerous. Sustained temperatures above 100°C indicate a cooling problem worth investigating.
Speed Optimizer: The Safe One-Click Starting Point
What it is: A one-click automatic overclock that Intel has validated as broadly safe for most configurations.
What it actually does: Speed Optimizer increases core multipliers and adjusts power limits automatically, without requiring you to understand what those values mean. It’s designed to give a meaningful performance boost with minimal risk of instability Intel’s version of AMD’s simple PBO enable.
How to use it: Compact View → click Speed Optimizer → confirm when prompted. XTU will apply settings and ask for a restart. After rebooting, run a benchmark to confirm the system is stable. Intel recommends using the integrated XTU benchmark for comparison, but Cinebench R23 or 2024 running for 10 minutes gives a fuller stability check.
Advanced Tuning: For Intermediate Users
The Advanced Tuning section is where experienced users adjust individual parameters. For most gamers, Speed Optimizer covers the useful ground without this complexity. Here’s what each section means if you want to explore further:
Core Ratio (Multiplier): This directly sets your CPU’s clock speed. A Core i9-14900K with a ratio of 57 on performance cores runs at 5.7GHz. Increasing this above your CPU’s rated boost clock gives more performance but requires voltage support and cooling capacity. Increase in steps of one ratio at a time and test stability after each change.
Power Limits (PL1/PL2): PL1 is the sustained power limit (how many watts the CPU can use long-term). PL2 is the short-term burst limit. Many Z-series motherboards already remove these limits by default. If your CPU is thermally throttling during sustained workloads rather than power throttling, raising PL1 gives it more room. Don’t raise PL2 without adequate cooling.
Core Voltage: Increasing voltage gives the CPU more headroom to hit higher frequencies stably. Decreasing it (undervolting) can reduce temperatures and power draw at the same performance level. The VF Curve tab in older XTU versions attempted per-frequency voltage adjustments, but Intel no longer supports it reliably on 13th Gen and newer chips skip it entirely.
Memory XMP: XTU can enable and switch XMP profiles for your RAM without a BIOS reboot. This is the same function as enabling XMP in BIOS described in the Windows 11 guide use whichever route you find more convenient.
Profiles and the One Safety Net Worth Knowing
XTU supports saving named profiles for different configurations. If you crash after applying settings, XTU automatically reverts to default on the next boot this is intentional and means aggressive tuning attempts won’t permanently brick a stable system. You’ll just reboot to stock and try a more conservative approach.
Use this safety net deliberately: make a change, test stability, save the profile only when stable. Never skip the stability test step a crash under light load in XTU’s built-in stress test means a crash in a game is coming sooner or later.
The Honest Bottom Line for Both Tools
For entry-level gamers: install Ryzen Master or XTU, look at your dashboard once to understand what normal looks like for your system, and close it. The monitoring data is genuinely useful. The tuning tools are optional.
For intermediate gamers on AMD: enable PBO without touching Curve Optimizer. Measure the difference. If you see meaningful gains in Cinebench and games feel smoother, the one change was worth the ten minutes. Curve Optimizer is the next step when you’re ready to invest more time.
For intermediate gamers on Intel K-series: run Speed Optimizer, test stability, done. Advanced tuning delivers incrementally more performance for significantly more time investment. The return diminishes quickly beyond Speed Optimizer unless you’re specifically chasing benchmark records.
Neither tool is dangerous if used incrementally and tested after every change. The risk in both tools comes from making multiple large changes simultaneously and skipping stability testing.
SpecClear participates in affiliate programmes. When you purchase through links on this site we may earn a commission at no additional cost to you.
Continue Reading: The Full Gaming Optimisation Series
This article is part of SpecClear’s complete PC gaming optimisation series. Work through all six guides to get the most out of your hardware.