
Your PC is probably leaving performance on the table right now. Not because of the hardware because Windows 11 ships configured for a general-purpose machine, not a gaming rig. Security features are enabled by default that reduce frame rates by up to 15%. Your RAM is almost certainly running slower than you paid for. Your GPU is scheduling frames through a pipeline that adds unnecessary CPU overhead. None of this requires new hardware to fix. It requires about 30 minutes and the confidence to know what you’re changing and why.
This guide covers every Windows 11 gaming optimisation setting worth adjusting for gaming, in order of impact. Each one gets a plain-language explanation of what it actually does before you’re asked to change anything. Entry-level gamers will know what to do and why it’s safe. Intermediate gamers will understand the mechanism well enough to make informed decisions based on their specific setup.
One important note before starting: some of these changes involve BIOS settings and system security features. None of them are dangerous if followed correctly, but you should create a Windows System Restore point before making any changes, as good practice. Press the Windows key, search “Create a restore point,” click the result, and follow the prompts. Takes two minutes and gives you a safety net.
Required:
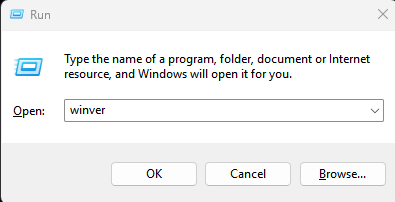
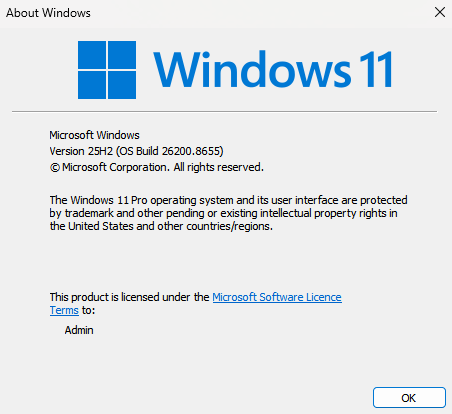
Windows 11. Most settings here apply to all Windows 11 versions, but where a specific version is required, it’s called out clearly. To check your version: press Windows + R, type winver, press Enter.
Step 0 — Before Anything Else: Check Your RAM Speed
This is the most impactful thing on this list for most people and the most commonly overlooked.
What it is: Your RAM ships with a factory-set speed profile. By default, every motherboard ignores that profile and runs your memory at a slow JEDEC baseline speed typically 4800 MT/s for DDR5 regardless of what’s printed on the box.
What it actually does: Enabling your RAM’s rated speed profile delivers 10–18% better frame rates in CPU-intensive games, and reduces micro-stuttering across all titles. On Ryzen processors specifically, RAM speed directly affects Infinity Fabric clock speed, which governs how quickly the CPU cores communicate with each other and with memory. Running your DDR5-6000 kit at 4800 MT/s is like buying a sports car and leaving it in second gear.
Check if you need to do this first:
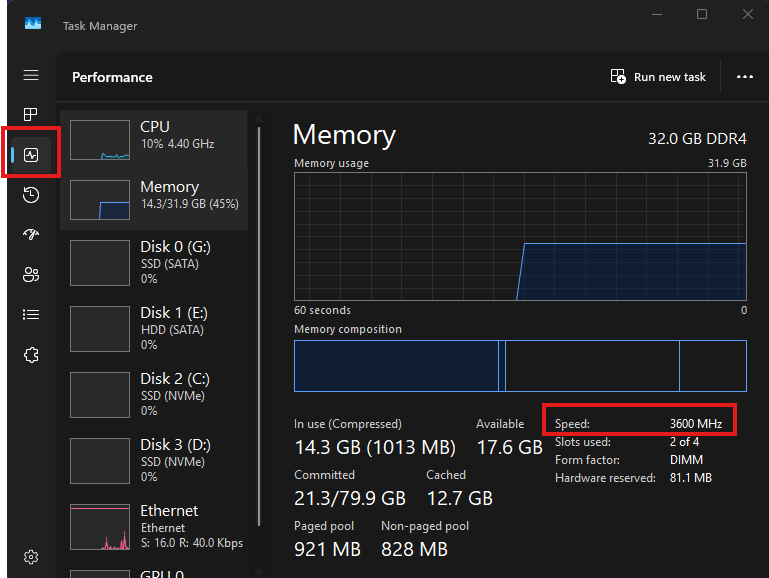
Open Task Manager (Ctrl + Shift + Esc), click the Performance tab, select Memory. Look at the Speed field. If it shows 4800 MT/s and your RAM kit is rated for 6000 MT/s, you’re running at the wrong speed.
How to fix it — Intel systems: Restart your PC. Press Del or F2 repeatedly during the boot logo (the exact key is usually shown briefly on screen watch for it). Once in BIOS, look for a section called AI Tweaker (ASUS), Extreme Tweaker (ASUS), OC (MSI), Tweaker (Gigabyte), or Overclocking. Find the option labelled XMP and enable it. Select Profile 1. Save and exit (usually F10). After Windows loads, verify in Task Manager that the speed now matches your kit’s rated frequency.
How to fix it — AMD systems: Same process, but the setting is called EXPO rather than XMP. On some AMD boards (particularly older ASUS models) it may be labelled DOCP this is functionally the same thing. If your kit has both XMP and EXPO profiles available in the BIOS dropdown, choose EXPO on an AMD system it’s specifically tuned for Ryzen’s memory controller with tighter timings than the XMP profile, which was designed for Intel.
Caveat: If the system won’t boot after enabling XMP/EXPO, it typically means the profile is pushing your specific hardware combination beyond its stable limit. Clear CMOS (remove the motherboard battery for 30 seconds, or use the Clear CMOS jumper check your motherboard manual), boot at JEDEC defaults, update your BIOS to the latest version from your motherboard manufacturer’s website, then try again. If instability persists, choose a slightly lower speed profile or contact your RAM manufacturer’s support.
Step 1 — Check Your Display Refresh Rate
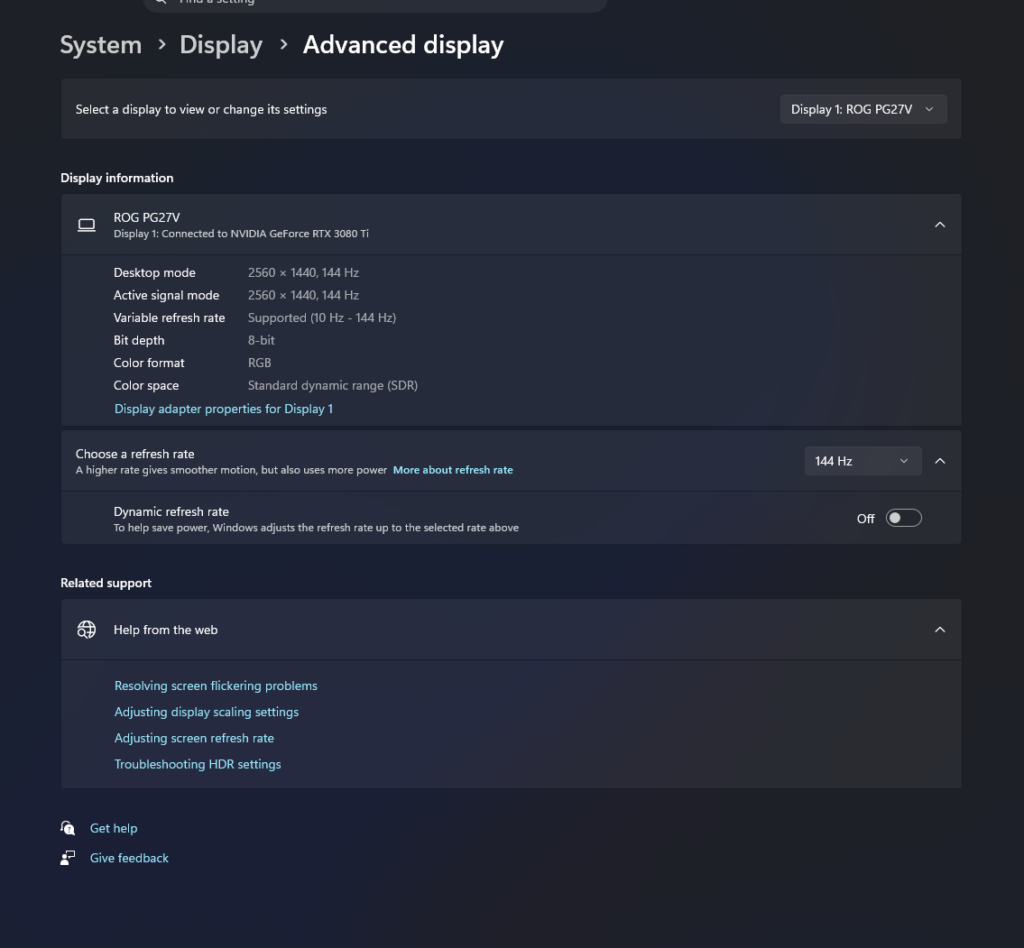
Do this before anything else in Windows. It’s the most commonly missed setting and it costs nothing to fix.
What it is: Your monitor has a maximum refresh rate — 144Hz, 165Hz, 240Hz, or similar. Windows doesn’t always set this automatically.
What it actually does: Running a 144Hz monitor at 60Hz means every game you play is capped at 60fps regardless of what your GPU produces. This single setting determines the ceiling for everything else in this guide.
How to check and fix it: Settings → System → Display → Advanced display. Look at “Choose a refresh rate.” Change it to your monitor’s maximum rated value. If you don’t know your monitor’s maximum, check the label on the back of the monitor or search the model number.
Step 2 — Switch Your Power Plan
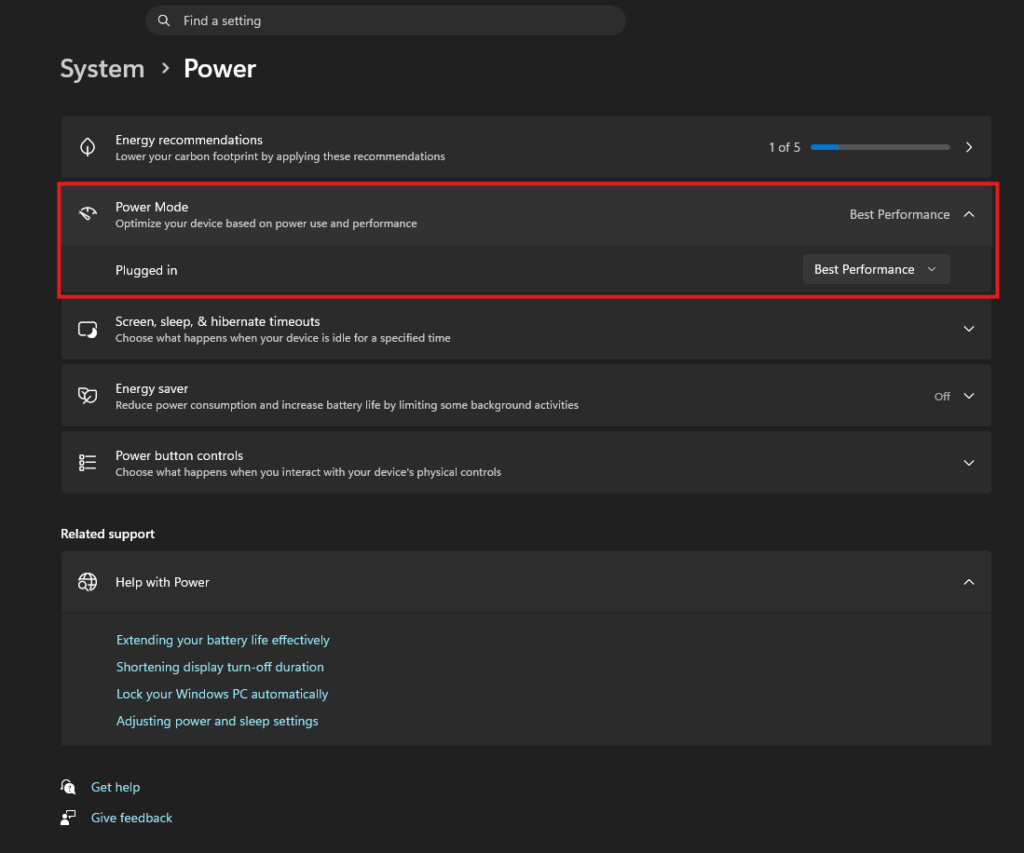
What it is: Windows manages CPU clock speed dynamically. The Balanced plan the default aggressively reduces CPU frequency during brief pauses between frames to save power. High Performance prevents those reductions.
What it actually does: The Balanced plan sometimes downclocks the CPU at exactly the wrong moment when a heavy draw call hits during a frame and the processor was already in a low-power state. The result is a frame rate spike that reads as a stutter rather than a consistent drop. High Performance keeps the CPU at maximum clock at all times during gaming, eliminating that specific source of inconsistency. The gain varies by title: CPU-bound games benefit the most, GPU-bound games at high resolutions see minimal difference.
For AMD Ryzen systems: Install the AMD chipset driver from AMD’s website (amd.com/en/support) if you haven’t already. This adds a dedicated “AMD Ryzen High Performance” power plan tuned specifically for Ryzen’s preferred core scheduling behaviour. Use this instead of the generic Windows High Performance plan.
How to enable it: Settings → System → Power → Power mode → set to “Best performance.” On older Windows 11 builds this may appear as a dropdown showing power plan names directly.
Caveat: High Performance keeps the CPU at full clock even during idle, which increases electricity use slightly and generates more heat. On a desktop gaming PC this is irrelevant. On a laptop, use High Performance only when plugged in and gaming — switch back to Balanced for battery use.
Step 3 — Enable Hardware-Accelerated GPU Scheduling (HAGS)
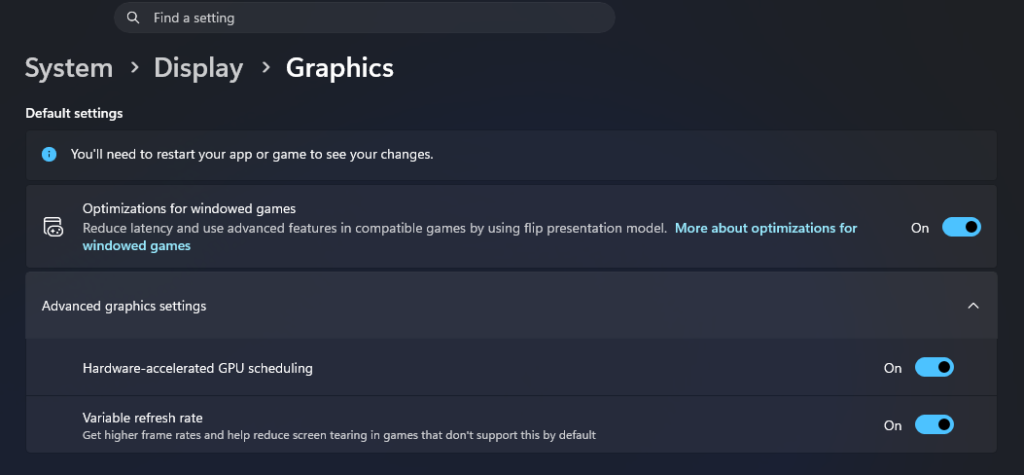
What it is: Normally, Windows handles the queue of work the GPU needs to complete deciding which tasks get GPU time and in what order. HAGS moves that scheduling responsibility onto the GPU itself.
What it actually does: By managing its own work queue directly, the GPU cuts the CPU out of a loop it didn’t need to be in. The result is lower input latency and more consistent frame pacing, particularly noticeable in CPU-heavy scenes where the GPU was previously waiting for Windows to pass it work. HAGS is also a hard requirement for NVIDIA DLSS Frame Generation on RTX 40 and RTX 50 series cards if HAGS is off, Frame Generation will not activate regardless of any other setting.
Requirements: Windows 10 version 2004 or any version of Windows 11. NVIDIA GTX 1000 series or newer, AMD RX 6000 series (RDNA 2) or newer, or Intel Arc. Your GPU driver must support WDDM 2.7 or later any driver released in the last two to three years will meet this. If you don’t see the option in Windows settings, your GPU or driver doesn’t support it.
How to enable it: Settings → System → Display → Graphics → Change default graphics settings → toggle Hardware-accelerated GPU scheduling to On → restart your PC. The restart is mandatory the toggle does nothing until the system reboots.
Caveats: HAGS allocates up to 1GB of additional VRAM to maintain on-GPU command queues. If you’re running an 8GB VRAM card and already hitting limits in demanding 2026 titles, enabling HAGS can cause more stuttering than it prevents. Enable it, play your most demanding game for an hour, and check your 1% low frame rates using an in-game overlay or MSI Afterburner. If 1% lows got worse, disable it. For content creation and video editing workflows, HAGS can occasionally reduce rendering performance benchmark both states if you use your gaming PC for production work.
Step 4 — Enable Optimisations for Windowed Games
What it is: Windows 11 gaming optimisation Most modern games default to Borderless Windowed mode rather than Exclusive Fullscreen. By default, Borderless Windowed doesn’t get the same low-latency treatment as Exclusive Fullscreen.
What it actually does: This setting applies the same low-latency resource allocation and scheduling Windows uses for Exclusive Fullscreen to Borderless Windowed games as well. It means DLSS, AMD FSR, and G-Sync/FreeSync all function at their full capability in Borderless Windowed mode rather than being partially constrained.
How to enable it: Settings → System → Display → Graphics → Change default graphics settings → toggle Optimizations for windowed games to On.
Requirement: Windows 11 22H2 or later. Check your Windows version with Win + R → winver if unsure.
Step 5 — Check Virtualization-Based Security (VBS) Status
This is the most impactful security-versus-performance trade-off in Windows 11, and the one most people don’t know exists on their system.
What it is: VBS uses your CPU’s hardware virtualisation to create an isolated memory area where Windows runs security processes. HVCI (Memory Integrity) is the component of VBS that prevents unsigned or suspicious code from accessing the kernel. Together they form a meaningful security layer.
What it actually does to gaming performance: The hypervisor overhead from VBS and HVCI adds latency to every memory allocation and system call your games make. Tom’s Hardware tested 15 games on an RTX 4090 and found performance reductions of up to 15% with VBS enabled and that’s on top-tier hardware. Older CPUs and games with many small thread operations show the largest impact. Neowin’s testing found an average 8% performance penalty across titles, with the gap being most pronounced in CPU-bound scenarios.
Before touching anything — check if it’s actually running: Press Win + R, type msinfo32, press Enter. In the System Summary, find the row labelled “Virtualization-based security.” If it says “Not enabled,” you don’t need to change anything. If it says “Running,” it’s active.
The decision: VBS provides real security value. On a gaming PC that doesn’t handle sensitive work data and sits on a home network behind a router, the security-to-performance trade-off is worth examining. On a work machine that also handles corporate data, banking, or sensitive documents, think carefully before disabling it. This is a personal decision, not a blanket recommendation.
If you decide to disable it: Settings → Privacy & security → Windows Security → Device Security → Core isolation details → toggle Memory Integrity to Off → restart. After restarting, verify in msinfo32 that the status reads “Not enabled.” If it still shows “Running,” the setting may be enforced by Group Policy check with your IT department if this is a managed work machine, or search “disable VBS Windows 11 registry” for the manual registry method applicable to Windows 11 Home.
Step 6 — Enable DirectStorage
What it is: DirectStorage is a technology that routes game asset loading from your storage directly to the GPU’s VRAM, bypassing the CPU entirely.
What it actually does: Traditional game loading goes NVMe SSD → CPU (decompression) → system RAM → GPU VRAM. DirectStorage cuts the CPU out: NVMe SSD → GPU hardware decompressor → VRAM. In supported games, this reduces load times from 10+ seconds to under 2 seconds and eliminates mid-game hitches caused by asset streaming. It also frees CPU cycles that would otherwise be spent on decompression.
Requirements: Windows 11 (any version). An NVMe SSD DirectStorage does not work over SATA. An updated GPU driver from Nvidia, AMD, or Intel. A DirectStorage-enabled game currently supported titles include Forza Horizon 5, Forza Motorsport, Senua’s Saga: Hellblade II, and a growing number of 2026 releases.
How to check if it’s active: Open Xbox Game Bar (Win + G) → Settings (gear icon) → look for a DirectStorage entry. If your games are installed on an NVMe drive and your drivers are current, DirectStorage is enabled automatically there’s no toggle to find.
If your games are on a SATA drive: Move them to an NVMe drive. DirectStorage only activates over NVMe. A 1TB NVMe SSD currently costs $50–60 and is the single most impactful hardware upgrade available for any system still running games from a hard drive or SATA SSD.
Step 7 — Clean Up Your Startup Programs
What it is: Every application you install wants to run something in the background from the moment Windows boots. Over time this accumulates into a collection of processes that sit in memory, occasionally spike CPU usage, and compete with your game for resources.
What it actually does: Startup bloat doesn’t always cause visible problems, but it does cause occasional frame time spikes when a background service wakes up to do something a software updater checking for new versions, a game launcher refreshing its library, a monitoring tool polling its servers. Cleaning it up removes unpredictable interference.
How to do it: Task Manager (Ctrl + Shift + Esc) → Startup apps tab. Sort by “Status” so enabled items appear first. Look through the list for anything you don’t need running permanently Discord, Steam, launcher software for games you rarely play, browser extensions with background processes. Right-click → Disable on anything that doesn’t need to start with Windows. Don’t disable your GPU driver software (Nvidia App, AMD Adrenalin) or audio drivers. When in doubt, search the name of any unfamiliar process before disabling it.
Step 8 — Manage Background App Permissions
What it is: Windows 11 allows apps to run in the background even when they’re not open, refreshing content, syncing data, and consuming memory.
What it actually does: Each background app represents a small ongoing draw on RAM and occasional CPU spikes. The cumulative effect of several of them running simultaneously is measurable in games that are memory-sensitive or CPU-bound.
How to manage it: Settings → Apps → Installed apps. Click any app → Advanced options. Set “Background app permissions” to Never for apps with no reason to run when you’re not using them social media apps, streaming services, utilities you open manually. Leave anything that genuinely needs background access (VPN clients, antivirus, cloud backup services) on its default setting.
Step 9 — Update Your GPU Drivers
This should be obvious but it’s included because outdated GPU drivers are one of the most common causes of preventable performance problems.
What it is: GPU drivers are the software layer between Windows and your graphics card. Driver updates fix bugs, optimise performance for new game releases, and add support for new features.
What it actually does: Game-specific driver optimisations from Nvidia and AMD can add 3–7% performance in supported titles on release day. More importantly, driver bugs that cause stuttering, crashes, or artefacts are regularly fixed in updates. Running drivers that are several versions behind is the first thing any GPU manufacturer will ask about when you report a problem.After applying these settings, run a stress test to confirm your system is stable and temperatures are within range under gaming load.
For Nvidia users: Download the Nvidia App from Nvidia.com. It manages driver updates and replaces the older GeForce Experience. Open it and check for updates under the Drivers section.
For AMD users: Download AMD Software: Adrenalin Edition from amd.com/en/support. Check for updates under Software → Check for Updates.
For Intel Arc users: Download Intel Arc Control from intel.com/arc. Updates are available through the software’s update section.
Caveat: Occasionally a new driver introduces a regression a bug that makes something worse rather than better. If you update and immediately experience problems, roll back to the previous driver. Both Nvidia App and AMD Adrenalin allow this directly within their software. For clean driver installs when troubleshooting persistent issues, use Display Driver Uninstaller (DDU) a free tool that removes all driver files before reinstalling from scratch.
What to Do After Making These Changes
Don’t try to evaluate all of these changes simultaneously. Enable two or three, play your most demanding game for an hour, and check whether your target metrics improved. The monitoring article in this series covers how to set up an in-game overlay to track GPU temperature, CPU load, frame times, and VRAM usage which tells you precisely whether changes are having the effect you expect.
If anything behaves unexpectedly after making these changes, your System Restore point is the safety net. Win + R → rstrui → follow the prompts to roll back.
SpecClear participates in affiliate programmes. When you purchase through links on this site we may earn a commission at no additional cost to you.
Continue Reading: The Full Gaming Optimisation Series
This article is part of SpecClear’s complete PC gaming optimisation series. Work through all six guides to get the most out of your hardware.