
SpecClear earns a commission if you buy through Newegg links on this page, at no extra cost to you.
You press the power button, the fans spin up, the RGB lights come on, and the monitor just sits there saying “no signal”. It is one of the most deflating moments in PC building, and it happens after brand new builds and simple GPU swaps alike. The good news is that a PC that powers on but will not POST or show a picture is usually fixable at home, and most causes come down to a handful of things: memory, BIOS support, power cables, or where the monitor is plugged in.
This guide walks through the checks in the order that finds the problem fastest, starting with the free ones that take seconds and ending with a stripped-down minimal boot. Work through it in order and resist the urge to start swapping parts at random.
Less experienced builders often freak out the first time their PC refuses to POST, when in reality it is usually down to a simple, easy-to-correct error. The right process when this happens is to first double check the setup against anything you have recently replaced or changed on the system: new RAM sticks, a new SSD, or system and BIOS settings you might have changed by mistake or while trying something out. If it is a new build that won’t POST, it is very likely an issue with the build itself, such as something not connected correctly, or a part that is the wrong spec or unsupported.
First, figure out which problem you actually have
“Won’t POST” and “no display” sound the same, but they point in different directions. AMD splits boot failures into three groups, and it is worth deciding which one you are in before touching anything:
- No power: nothing spins and nothing lights up. That is a PSU, wall socket, front panel or 24-pin problem, and a different guide: see what to do when your PC won’t turn on.
- No POST: fans spin and lights come on, but the board never finishes its power-on self test. A debug LED usually stays lit and you never reach the BIOS logo.
- No display: the PC may well have POSTed (you might hear Windows start, or see keyboard lights react), but no picture reaches the monitor.
If the system powers on and then shuts off again once it is under load, that is a separate issue covered in our guide to a PC that shuts down when gaming.
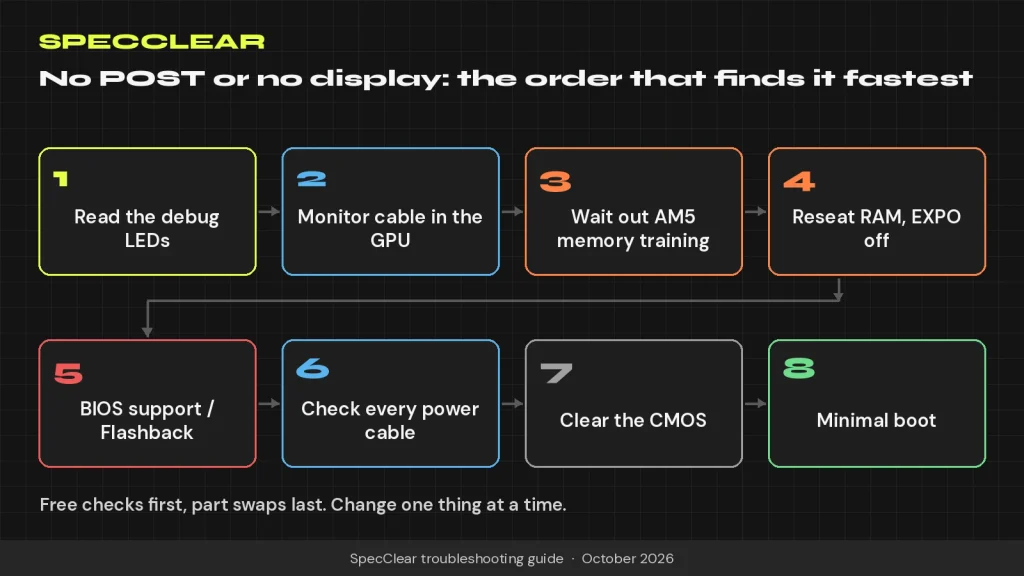
Step 1: Read the debug LEDs
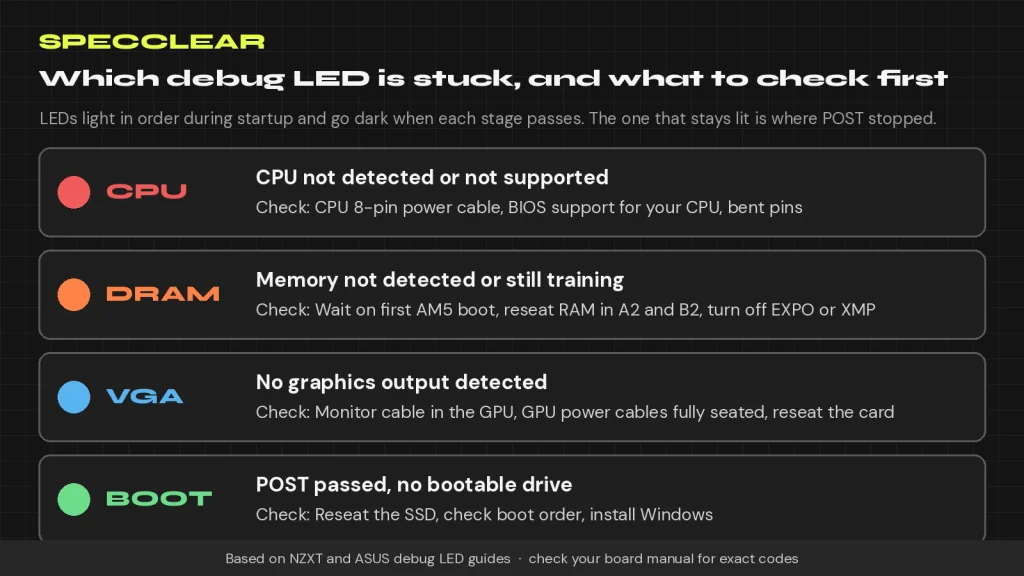
Almost every modern motherboard has four small LEDs labelled CPU, DRAM, VGA and BOOT, usually near the 24-pin connector. During startup they light in that order as the board checks each stage, then go dark when everything passes. If one stays lit, that is the stage where POST stopped. NZXT and ASUS describe them the same way:
- CPU: the CPU is not detected or not supported. Think CPU power cable, a bent pin, or a BIOS that does not know the chip.
- DRAM: memory not detected or failing training. Reseat the RAM and check the slots.
- VGA: no graphics output detected. Reseat the GPU, check its power cables and check the monitor cable.
- BOOT: POST passed but there is no bootable drive. The SSD may be loose or Windows may not be installed yet.
Higher-end boards add a two-digit Q-code display that gives a more specific code, which you look up in the manual. Our motherboard debug LED lookup turns the common LED and Q-code readouts into a fix list, and your manual has the full code table for your exact board. If you are shopping for a new board and want easier troubleshooting next time, boards with a debug LED or Q-code display are worth the small premium.
Step 2: Check the monitor cable before anything else
This one catches experienced builders too. If you have a graphics card installed, the monitor cable has to go into the card, not into the HDMI or DisplayPort sockets on the motherboard’s rear I/O. With a discrete GPU in place, most boards send video to the card, and the motherboard ports stay dark. That means a “dead” PC is often simply sending its picture to a port nothing is plugged into.
The reverse also matters. CPUs without integrated graphics, such as Ryzen “F” models or Intel “F” and “KF” chips, cannot output anything through the motherboard ports at all. While you are here, try a different cable and a different input on the monitor, and confirm the monitor is set to the correct input source. ASUS lists cable and input checks first in its own no-display guide for a reason.
Step 3: Give AM5 time to train its memory
On its first boot, and again after a BIOS update, a CMOS clear or a RAM change, an AM5 board runs DDR5 memory training, and during that time it shows nothing on screen, usually with the DRAM LED (or Q-code 15 on ROG boards) lit. Most of the time this is over in well under a couple of minutes, but with large or very fast kits it can sometimes take several minutes; ASUS notes it can run up to 5 to 15 minutes depending on capacity and memory density.
So if the DRAM LED is still lit, give it time before you assume something is wrong. Switching it off halfway just restarts the process, so only start troubleshooting if there is still no picture after around 15 minutes. Once it trains successfully, later boots are much quicker, and enabling Memory Context Restore in the BIOS shortens them further.
Most of us still have that “I hope it works” running through our minds the first time we turn on a PC we have just built. It is human nature. Most first boots take far longer than normal boots because the BIOS is checking each component individually for the first time, and the RAM often takes the longest since the board is trying to find the correct timings. Count on anything from 30 seconds to a minute before you see anything on the screen. This is normal, and you will need to fight the urge to power everything down out of fear or lack of faith.
Step 4: Reseat the RAM and run it at default speed
Memory is the most common reason a fresh build will not POST. DDR5 sticks need firm, even pressure until both latches click, and a stick that looks seated can still be a millimetre short on one end. Check the manual for the right slots too. With two sticks, boards almost always want them in A2 and B2 (the second and fourth slots from the CPU), not side by side.
If you enabled EXPO or XMP and the PC stopped booting afterwards, the memory profile is the prime suspect. Clear the CMOS (see step 7) to return to stock speeds, confirm the system boots, then try the profile again or step down one speed grade. If the DRAM LED stays on, AMD’s own advice is to test each stick on its own and in different slots, which isolates a bad module or slot. Once you are booting, our guide on how to stress test RAM will confirm the kit is stable. For a new AM5 build, a 32GB DDR5-6000 CL30 kit is the safe sweet spot that most boards train without fuss.
Step 5: Make sure the BIOS supports your CPU
A brand new CPU on a board that has been sitting in a warehouse is a classic no-POST cause. The board physically fits the chip, but its BIOS predates it and does not know how to start it, so you get a CPU or DRAM LED and no picture. Chips released this year, such as the Ryzen 7 9850X3D, Ryzen 7 7700X3D or Core Ultra 7 270K Plus, are the usual suspects on older 600-series AM5 and early Z890 boards.
Check your board’s CPU support list on the manufacturer’s site and note the minimum BIOS version. If your board has BIOS Flashback (ASUS BIOS FlashBack, MSI Flash BIOS Button, Gigabyte Q-Flash Plus or ASRock BIOS Flashback), you can update it without a working CPU: download the BIOS file, put it on a FAT32 USB stick, rename it if the manual asks, plug it into the marked USB port and press the button with only the PSU connected. AMD also lists a USB flashback or backup BIOS as the next step when clearing CMOS has not helped. Our PC component compatibility checker flags common CPU and board pairings that need a BIOS update before you buy.
Step 6: Check every power cable, especially the GPU
A PC that powers on but will not POST is often missing one cable. Check the 24-pin motherboard connector and the 8-pin (or 4+4) CPU power cable at the top left of the board. A missing CPU cable will give you spinning fans and a lit CPU LED with no display. Never plug a PCIe GPU cable into the CPU socket on the board; they look similar but are wired differently.
For the graphics card, every power socket on the card needs its own cable. On cards with a 16-pin 12V-2×6 connector, push the plug in until it is fully seated with no visible gap, and avoid a tight bend right at the card. Use the native cable from an ATX 3.1 power supply if you have one, or the adapter that came with the card, using separate PSU cables for each input. If the VGA LED stays lit after a GPU upgrade, reseat the card firmly in the top x16 slot and check that the slot latch has clicked. If your current unit lacks a native 12V-2×6 cable for a modern card, an ATX 3.1 power supply is the clean fix, and our PSU calculator will tell you what wattage to buy.
Step 7: Clear the CMOS
Clearing the CMOS resets the BIOS to factory defaults, which undoes a bad overclock, a memory profile the system cannot handle, or a corrupted setting. Switch off the PSU at the back, then use the Clear CMOS button on the rear I/O if your board has one, or short the two CLRTC jumper pins with a screwdriver for a few seconds. Removing the coin battery for a few minutes also works. Remember that on AM5 the next boot will retrain memory, so give it the full time from step 3.
Step 8: Do a minimal boot
If nothing so far has worked, strip the system back to the bare minimum so you can add parts one at a time. ASUS and NZXT both recommend this approach:
- Leave only the CPU, cooler, one stick of RAM in the recommended slot, and the PSU connected.
- If your CPU has integrated graphics, remove the GPU and plug the monitor into the motherboard. If not, keep the GPU in the top slot.
- Disconnect all drives, USB devices except a keyboard, and front panel extras like RGB hubs.
- Power on and watch the debug LEDs. If you reach the BIOS screen, the core is fine, so add parts back one at a time until the fault returns.
If the board still will not POST with a single stick, try the other stick, then check the CPU socket for bent pins (Intel boards) or the CPU for damage. Building on a cardboard box outside the case also rules out a short from a misplaced standoff.
When it finally boots, but still misbehaves
Getting into the BIOS is the big win, but keep an eye on what happens next. If Windows crashes or restarts randomly once you are up and running, our guide to diagnosing PC crashes and blue screens picks up where this one leaves off. If a component still refuses to work after all of the above, particularly a board that shows no LEDs at all or a CPU that fails on two different boards, it is time to contact the retailer about a warranty replacement rather than keep troubleshooting.
Quick checklist
- Note which debug LED stays lit.
- Monitor cable in the GPU, correct input selected.
- Be patient on a first AM5 boot, especially with large or fast kits.
- Reseat RAM in A2 and B2, disable EXPO or XMP.
- Confirm BIOS support for your CPU and use Flashback if needed.
- Check 24-pin, CPU 8-pin and every GPU power cable.
- Clear the CMOS.
- Minimal boot, then add parts back one at a time.